BASIC SEAPERCH ROBOT:
Build Guide
Recommended for middle to high school students in teams of 2 or 3
SeaPerch is an innovative underwater robotics program for students to learn and practice engineering, design, and fabrication skills.
Launched in 2003 by the MIT SeaGrant College Program and continuing today through RoboNation (seaperch.org), SeaPerch trains teachers and students to build and navigate their own remotely operated vehicles, or ROVs. Aside from being engaging and fun, SeaPerch is a true DIY (Do-It- Yourself) program; students and teachers need to waterproof motors, affix propellers, and build electronics control boxes before operating the robots they design and build. Moreover, SeaPerch is adaptable to a variety of water environments, age groups, and educational settings.
This guide is written for students building SeaPerch underwater robots with pre-made controllers and thrusters. Instructions on completing those tasks can be found in a build guide linked at https://seaperch.org/resources/library/#build. The preparation work takes several hours, but can be done by students with adult supervision. Once built, the controllers and thruster assemblies can be used again and again on new robot designs.
How it works
This guide is written for students building SeaPerch underwater robots with pre-made controllers and thrusters. Instructions on completing those tasks can be found in a build guide linked at https://seaperch.org/resources/library/#build. The preparation work takes several hours, but can be done by students with adult supervision. Once built, the controllers and thruster assemblies can be used again and again on new robot designs.
The activities here are recommended for middle to high school students in teams of 2 or 3.
A simple list of materials and tools is presented at the beginning. A detailed list with ordering information is included at the end.

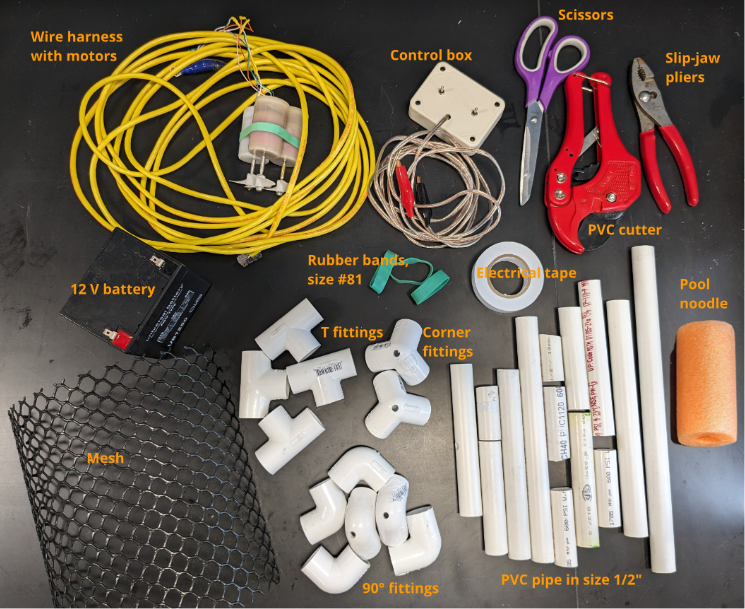
Materials and tools (for each team)
Materials and tools (for each team):
- Wire harness with 3 SeaPerch 12V motors
- Control box
- 12V battery
- Assortment of ½” PVC pipe – lengths from 3’’ to 12’’
- PVC pipe cutters
- 2 (or more) PVC corner fittings with holes (~¼”) drilled at corners
- 4 (or more) PVC T fittings
- 6 (or more) PVC 90° fittings, with holes (~¼”) drilled at corners
- Other PVC fittings as available
- Pool noodle, about 8” section
- Mesh (optional)
- Slip-jaw pliers
- 3 Rubber bands, #81 (2” x 1/2″ x 1/32”)
- Roll of electrical tape
- Scissors
Resources and buying guides
Resources and buying guides
RoboNation build resources for SeaPerch robot:
- SeaPerch online store: shop.robonation.org/collections/seaperch
- Parts list for DIY sourcing: SeaPerch-ROV-Parts-List-2020-09-10.pdf
- Build Guides: Resources Library – SeaPerch
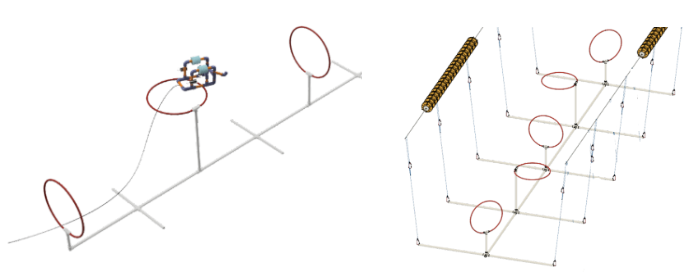
Step 1: Learn about the challenge
Step 1: Learn about the challenge
Review the rules of the game or challenge the robots will face.
Sample Game: Underwater Battlebots for 2 players in a pool
- Task: Collect ducks, and hoops to your side, protect the balloon
- Time: 2 minutes
- Scoring:
- Ducks 1 points
- Hoops 3 points
- Balloon 5 points
- Ex 1: collected 5 ducks and 2 hoops, balloon popped 5 + 6 + 0 = 11 points
- Ex 2: collected 7 ducks and no hoops, balloon not popped 7 + 0 + 5 = 12 points

Sample Challenge: Obstacle Course for individuals
- Task: Navigate the course in the time available. Start by surfacing in the start zone, go through all hoops, surface, return via the same path, surface at start zone.
- Time: 4 minutes
- Scoring: 100 points for 1st, 90 points for 2nd, 80 for 3rd, etc. Penalties for missing hoops.
Step 2: Learn the design rules
Step 2: Learn the design rules
Check the criteria and constraints that the robots must meet.
Sample rules:
- Total PVC pipe: 24”
- Total fittings: 2 corners, 4 T, 6 90°
- Overall dimensions: no larger than 8’’ wide x 10’’ deep x 8’’ tall
- Mount the L, R, U/D motors so that propellers are within the structure (propellers cannot hit the walls of the tank)
Step 3: Check the materials and learn building skills
Step 3: Check the materials and learn building skills
- Learn how to use the PVC cutter
- Drill holes in the corners of the 90° and corner fittings
- Collect materials for team
- Check that the motors, controller, and battery work.
a. Connect motor harness to controller by inserting the ethernet connector into the controller. This is the top of the controller.
b. Connect the red and black leads to the battery. Red to (+), Black to (-)
c. Push the right switch forward and backward to check the right motor (green wire). The propeller should push air away from the motors to move forward.
d. Repeat with the left switch and check the left motor with the blue wire.
e. Repeat with the pushbuttons and check the up/down motor with the blue wire.
Step 4: Build a frame and plan locations of motors
Step 4: Build a frame and plan locations of motors
- Tinker! Build a structure with the pre-cut PVC pieces. Take it apart and try something else. Try several ideas.
- Iterate through design/build/test cycles to improve the robot structure. Refer to the criteria and constraints to check the design.
- Decide where to mount the motors (RIght side, Left side, Up/Down).
a. To protect the motors and propellers, place motors on the interior of the structure.
b. Mounting the motors perpendicular to the PVC pipe will keep the propellers away from the PVC.
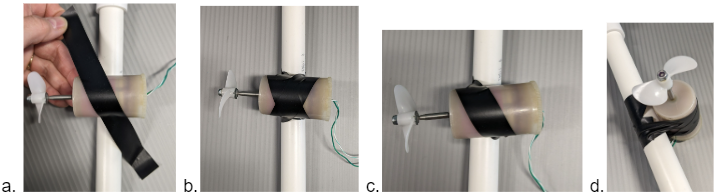
Step 5: Mount the motors
Step 5: Mount the motors
- Identify the motors by the wires. Green – right side. Blue – left side. Orange – up/down
- Attach the motors with electrical tape or rubber bands. Go to step 3 for electrical tape, or to step 4 for rubber bands.
- If using tape, cut strips of tape 8” long (2 per motor) and wrap them diagonally around the motor and the PVC pipe. Stretch the tape and fasten it onto itself.
a. Motor is perpendicular to pipe. Tape is diagonally across both.
b. Stretch and tighten tape and fasten it to itself.
c. Stretch and tighten another piece of tape on the other diagonal.
d. Motor mounted on pipe.
- If using rubber bands, collect 3 and stretch them a few times. Put the rubber band over the motor, lay the motor perpendicular to the PVC pipe, then stretch it over the propeller and on to the motor body. Adjust the location and tension of the rubber band as needed.
a. Rubber band around motor and being stretched around pipe
b. Rubber band looped back onto the motor body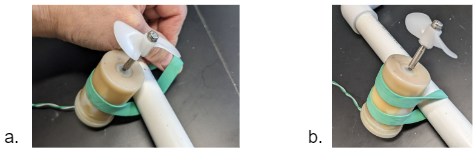
- Make a “strain relief” for the cable so that the robot can be lifted by the cable, without straining the wires going to the motors. Fasten the cable to the structure using electrical tape. Be sure to stretch the tape when fastening it.
a. Electrical tape in an X pattern around cable and PVC pipe
b. Electrical tape in a C pattern around cable and PVC pipe
Step 6: Add buoyancy and test the robot in the water
Step 6: Add buoyancy and test the robot in the water
- Add pieces of “pool noodles” for buoyancy.
a. Cut slices of the pool noodles. A metal ruler works well as a cutter.
b. Cut the piece open so it will fit over the PVC pipe.
c. Wrap electrical tape around the noodle to secure it to the PVC pipe.

- Refine the design and buoyancy until the SeaPerch moves in water as desired.
a. Too much buoyancy makes it difficult to go down, too little makes it hard to go up.
b. Moving the noodles towards the front or back will affect how level the SeaPerch is when moving forwards and backwards.
Step 7: Test and revise
Step 7: Test and revise
- Test the robot as soon as possible. To improve performance it is essential to observe the operation of the robot.
- Revise the robot as needed to perform the challenge. Sometimes it is best to pull the entire thing apart and start again.
Step 8: Finishing touches
Step 8: Finishing touches
- Give the robot a name!
- Add decorations that don’t interfere with motors.
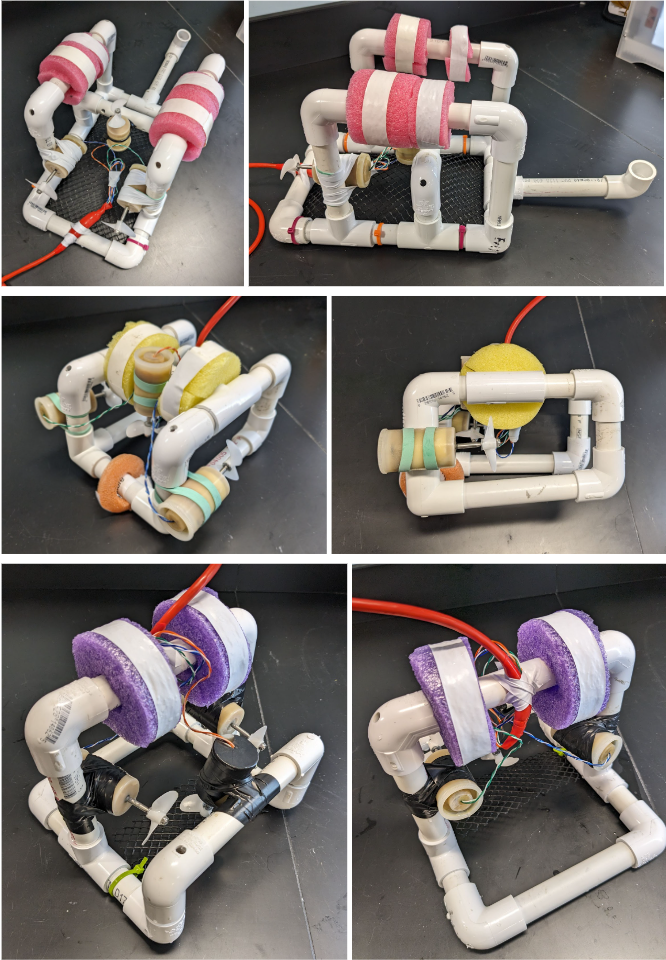
Examples of SeaPerch robots

Safety: Practice tool safety with an adult and follow directions for materials used in this module (e.g. work in a properly ventilated area, wear safety glasses, long sleeves, and vinyl gloves).
